
Can the PC’s mouse input be used to send binary data from an embedded system to a desktop software? And, more importantly, can this be done without affecting the regular usage of the mouse? As it turns out, within a few limitations, the answer is yes. Here’s how.
Important note: Apparently, too many readers take this at face value and suggest more effective ways to send information. I wish to make it clear that this project is really nothing more than a proof of concept, made only to show that it can be done. That’s all.
A while ago I got a couple of DigiSparks – small ATtiny85-based boards that utilize the V-USB software to emulate a USB keyboard or mouse. They worked, but I couldn’t find a practical way to communicate with them by Serial, which was crucial for the kind of project I had in mind.
Then, after doing some unrelated work with the Arduino Leonardo mouse emulation, I realized that by manipulating mouse movements carefully, and observing them carefully in software, I could transfer data – without the human user noticing any significant interference. This scheme has some technical limitations that make it a less-than-perfect solution, but it can still serve some purposes, and definitely be an interesting proof of concept.
Data In Motion
Any modern programming language with GUI libraries can intercept mouse events related to its visual components, and read (among other things) the current X and Y coordinates of the pointer. Comparing old and new coordinates gives us a means to infer data – for instance, a move to the right can be interpreted as a “0” bit, while a move to the left can represent a “1”. However, with that scheme, an unbalanced sequence of 0’s and 1’s will send the pointer flying out of range and out of control.
We can improve this significantly by introducing more complex moves, which will guarantee that the pointer returns eventually to the starting position. For example, “0” would be right-then-left, and “1” will be up-then-down. Mouse emulators can do this in single-pixel steps, and at a super-human speed, so the human user will hardly notice something is going on.
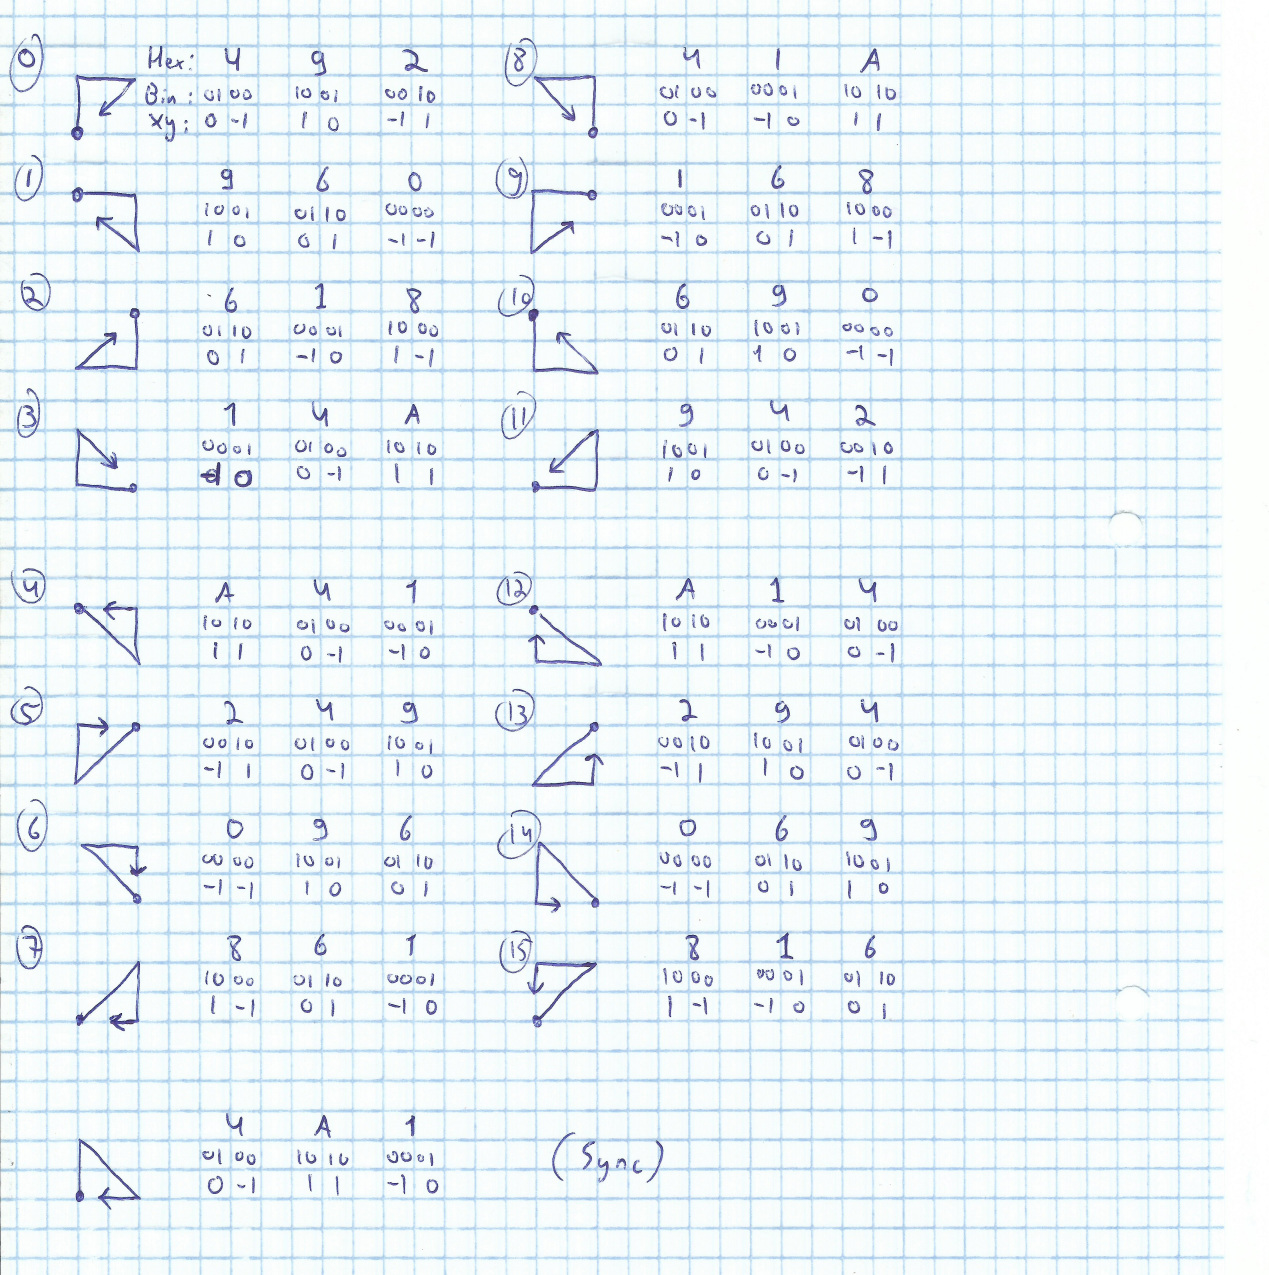
This “right-left/up-down” scheme costs two motions per bit. Moreover, we can easily imagine scenarios where normal mouse usage may be misinterpreted as a valid bit. With some extra thought, schemes can be devised which are more economical and less error prone. I developed one such scheme, where the pointer is moved in any of 16 predefined patterns, three steps each, as shown in the image below. This way, three movements represent four bits, and no user will replicate the sequence by mistake.
Out Of Touch
Before moving on to implementation, there are two subtleties that require our attention. The first is the matter of interference, namely what happens if the user moves the mouse during data transmission. This will invalidate the data for sure, but will not corrupt it, because this complex movement scheme makes it very easy to spot steps out of sequence. In other words, we may lose some data, but whatever’s left is almost certainly correct.
The other issue is that ultimately we would like to transmit whole bytes (8 bits each), but every sequence transmits just one nybble (4 bits). With all the potential interference around, how do we know for sure which nybble is the “high” one and which is the “low”? To solve this, I’m sending a unique “sync sequence” before each byte.
Implementation. Leonardo Style
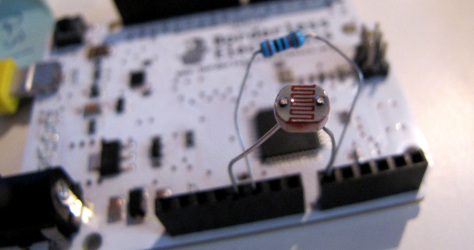
This story began with a DigiSpark, but I’ll use my Leonardo-compatible here because it’s a tad more convenient. First, I encoded my 17 sequences (16 nybble values + 1 sync) in a reference table, each entry being 12 bits net (2 bytes gross) in size. I wrote a function that decodes these entries and transmits one nybble, and a function that uses the previous one to send a whole byte (sync + 2 nybbles). On top of all that I created a small program that takes an analog reading from a light-dependent resistor, converts it to a scale of 0-255 and sends it through the mouse emulator once every 1/10 sec.
Now to the PC side. Using the Lazarus IDE for Free Pascal (yeah, deal with it) I wrote a small desktop application that displays a rectangle. It intercepts mouse pointer movements and tries to interpret them as bytes according to the aforementioned scheme. If successful, it changes the gray-scale shade of the rectangle per the data received.
The Overlooked Mousetrap
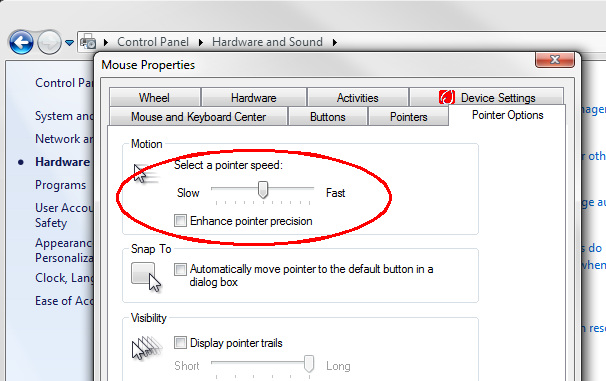
As you saw in the video above, this works – with one caveat: you have to disable all of the operating system’s mouse motion “enhancments”. Arduino’s Mouse.move takes X and Y parameters as number of pixels to move in each axis, but if any of the enhancements are active, this may not translate to actual X and Y pixel displacements of the mouse pointer on the screen.
In my Windows 7 laptop, these options are accessible through Control Panel->Hardware and Sound->Mouse, like so:
Another drawback is that although the data-bearing movements are small and fast, they are still noticeable as tiny vibrations of the pointer. This does not hinder most regular uses, but can be really annoying if you’re doing very precise mouse work (e.g. in image editing) or holding a scrollbar. These issues can be circumvented by adding controls on the Arduino side, to make sure data is sent through the mouse only when you’re ready for it.
The data transfer rate I was able to achieve using this method is about 150 Bytes (1200 Bits) per second. This number refers to the useful payload only – it does not include the sync signal bits.
Source Code And Stuff
The Arduino Leonardo source code for my example application is short enough to put here:
#define SYNC 16
const uint16_t MOUSE_SEQUENCE[17] = {
  0x0492, 0x0960, 0x0618, 0x014A, 0x0A41,
  0x0249, 0x0096, 0x0861, 0x041A, 0x0168,
  0x0690, 0x0942, 0x0A14, 0x0294, 0x0069,
  0x0816, 0x04A1 };

void sendMouseNybble(const uint8_t index) {

  uint16_t s = MOUSE_SEQUENCE[index];
  uint8_t steps = 3;
  int8_t dx, dy;

  while (steps--) {
      dx = ((s >> 10) & 3) - 1;
      dy = ((s >> 8) & 3) - 1;
      s <<= 4;
      Mouse.move(dx, dy);
  }
}

void sendMouseByte(uint8_t b) {
  // Sync signal, then high nybble, then low
  sendMouseNybble(SYNC);
  sendMouseNybble(b >> 4);
  sendMouseNybble(b & 0x0F);
}

void setup() {
  Mouse.begin();
}

void loop() {
  sendMouseByte(analogRead(A0) >> 2);
  delay(100);
}
For the hardware, you can just slap a simple LDR between 5V and A0, and a large-value resistor (e.g. 20K) between A0 and GND.
The FPC/Lazarus program is trickier because it is made of several files. I uploaded the interesting part of the code to Pastebin, where you can read and adapt it to your favorite language and IDE. The full source code can be downloaded here (tested only on Lazarus 1.4.0, Windows 7).
I take no responsibility for whatever damage you manage to do while playing with this. Share and enjoy!
P.S. This project was featured on Hackaday!