
In my long life I have tried, or at least considered, many kinds of tool organizing methods and setups. None was satisfactory. So I came up with an organizer of my own design, which I hereby present to the world.
Here’s a “wish list” of properties that an ideal organizer should have. The list is not sorted; the relative importance of each feature depends on the individual users, their tools and their work environments.
- Stable and safe – for the tools and for the user
- It’s fast and easy to find each tool and to pick it up
- Putting tools back should be easy too
- Doesn’t waste/take much space (including wall space!)
- Tool agnostic – not only for one specific kind
- Inexpensive
Existing solutions may excel on some criteria, but fail miserably on others. Take the crudest “tool drawer”, for instance: It’s as cheap and as tool-agnostic as it gets, and you can put things in it even in complete darkness; but rummaging around for a specific tool can be time consuming, and you can even hurt your fingers while doing so. Or, take a magnetic knife strip: highly accessible, but has trouble holding on to tools with thick insulating handles, such as small side cutters common in electronics. I am yet to see a commercial product that achieves everything on the list.
Early attempts
As my eclectic tool collection grew, I was pressed more and more to do something about it. My first thought – seeing how diverse the tool sizes are – was to 3D-print a custom solution for my particular case. This was to be a set of small modular “towers”, where each section has an angled slot/hole, front-to-back, fitted precisely for a specific tool. The prototypes sort of worked, but I still felt that they wasted space, and what’s worse – they introduced me to the 3rd item in the above list. It is not convenient to have a dedicated spot for each tool! It’s confusing enough to locate these spots when you have several tools to put back at the same time, and even if you know exactly where each one goes, it still requires some attention to insert it just right.
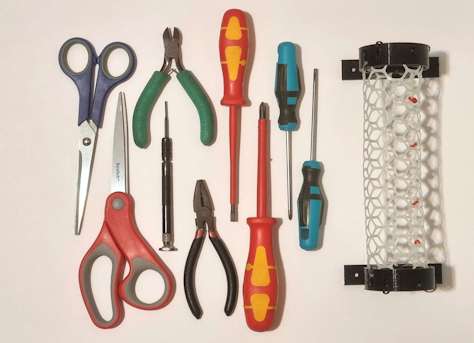
My next idea took the opposite approach. I measured my screwdrivers, cutters, pliers and scissors do determine the diameter of a “universal hole” – one into which I could insert a part of every tool, without that tool falling entirely through. Some of the smaller screwdrivers fell through (pun intended), but apart from that, the golden number turned out to be a little over 1cm. I don’t have the equipment to drill a lot of 1cm holes in a board, and printing such a board will take forever, so I figured maybe a mesh net will do the trick.
I ordered from Aliexpress a piece of 1.2cm-hole plastic mesh net, the kind that’s used to keep chicken, babies and other adventurous creatures out of harm’s way. I cut a rectangle out of it, attached it to a simple frame, and tried to use that like a perforated shelf. No good. Because the mesh is relatively thin and flexible, heavy tools just tipped over at the slightest touch and deformed the entire surface.
I needed something to counter that tipping-over. Maybe another mesh layer, a little below the first? How far below should it be? Should the holes be aligned or not? I turned the concept in my mind several times, until it hit me:
The mesh cylinder
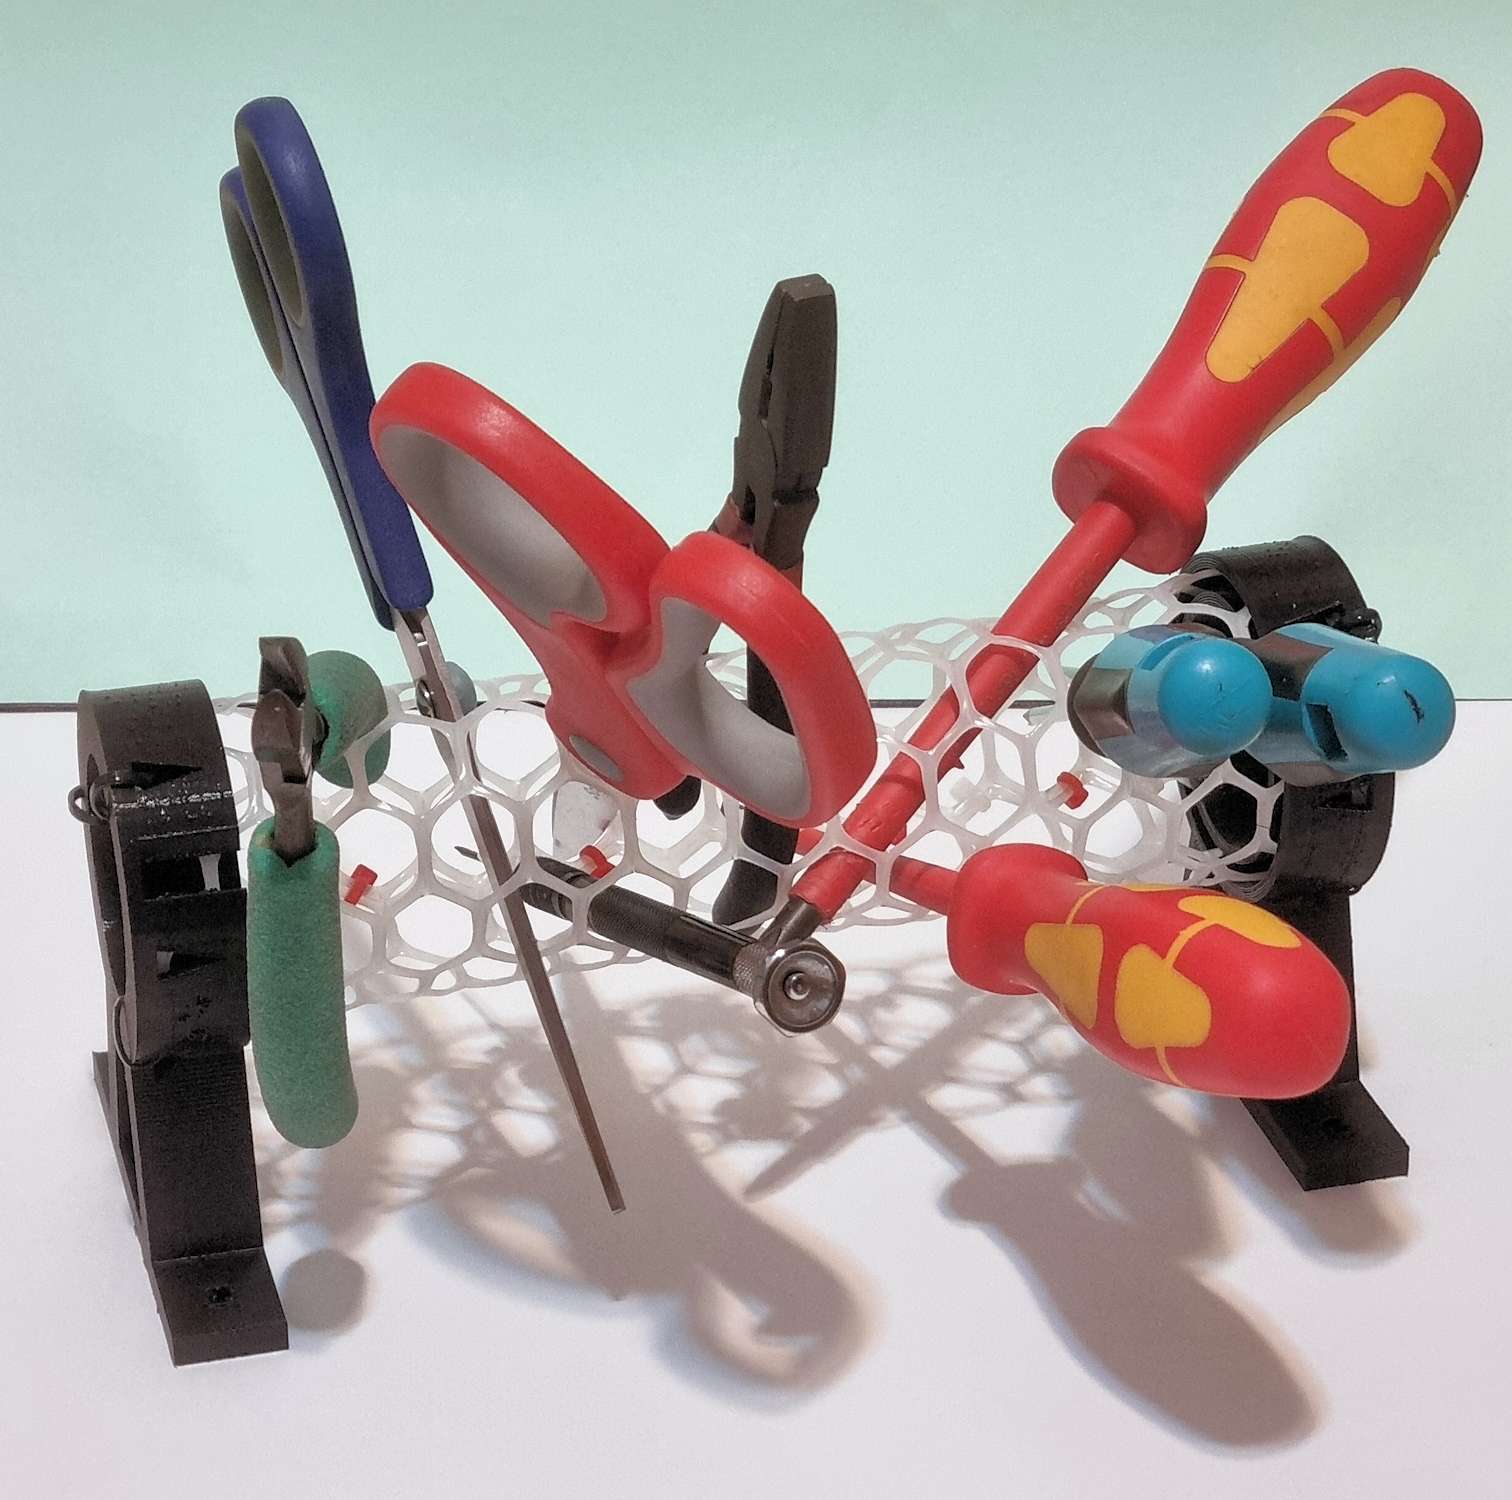
The cylinder form has two great advantages. First, to a degree it resists the deformation of the mesh under weight, and second – much more importantly – it gives each tool two contact points to support it. In terms of lever mechanics, if I’m not mistaken, gravity is the “Effort”, and the two contact points are a “Fulcrum” and a “Resistance”: the tool can be inserted in many different angles, and it will be held in place by its own weight. Two-handled tools also fit in nicely.
As you can see in the pictures, the result is not pretty, but it’s very effective: One small cylinder can support a lot of different tools, and they’re all clearly visible and easy to access. When you’re done with them, no need to remember or check where each one belongs – just find a vacant hole in the mesh for it. For extra stability of the whole setup, the side post’s “feet” can be screwed a board, or long bars, or simply printed longer. The materials for the organizer are cheap, and (once you know what you’re doing) constructing it is quick and easy.
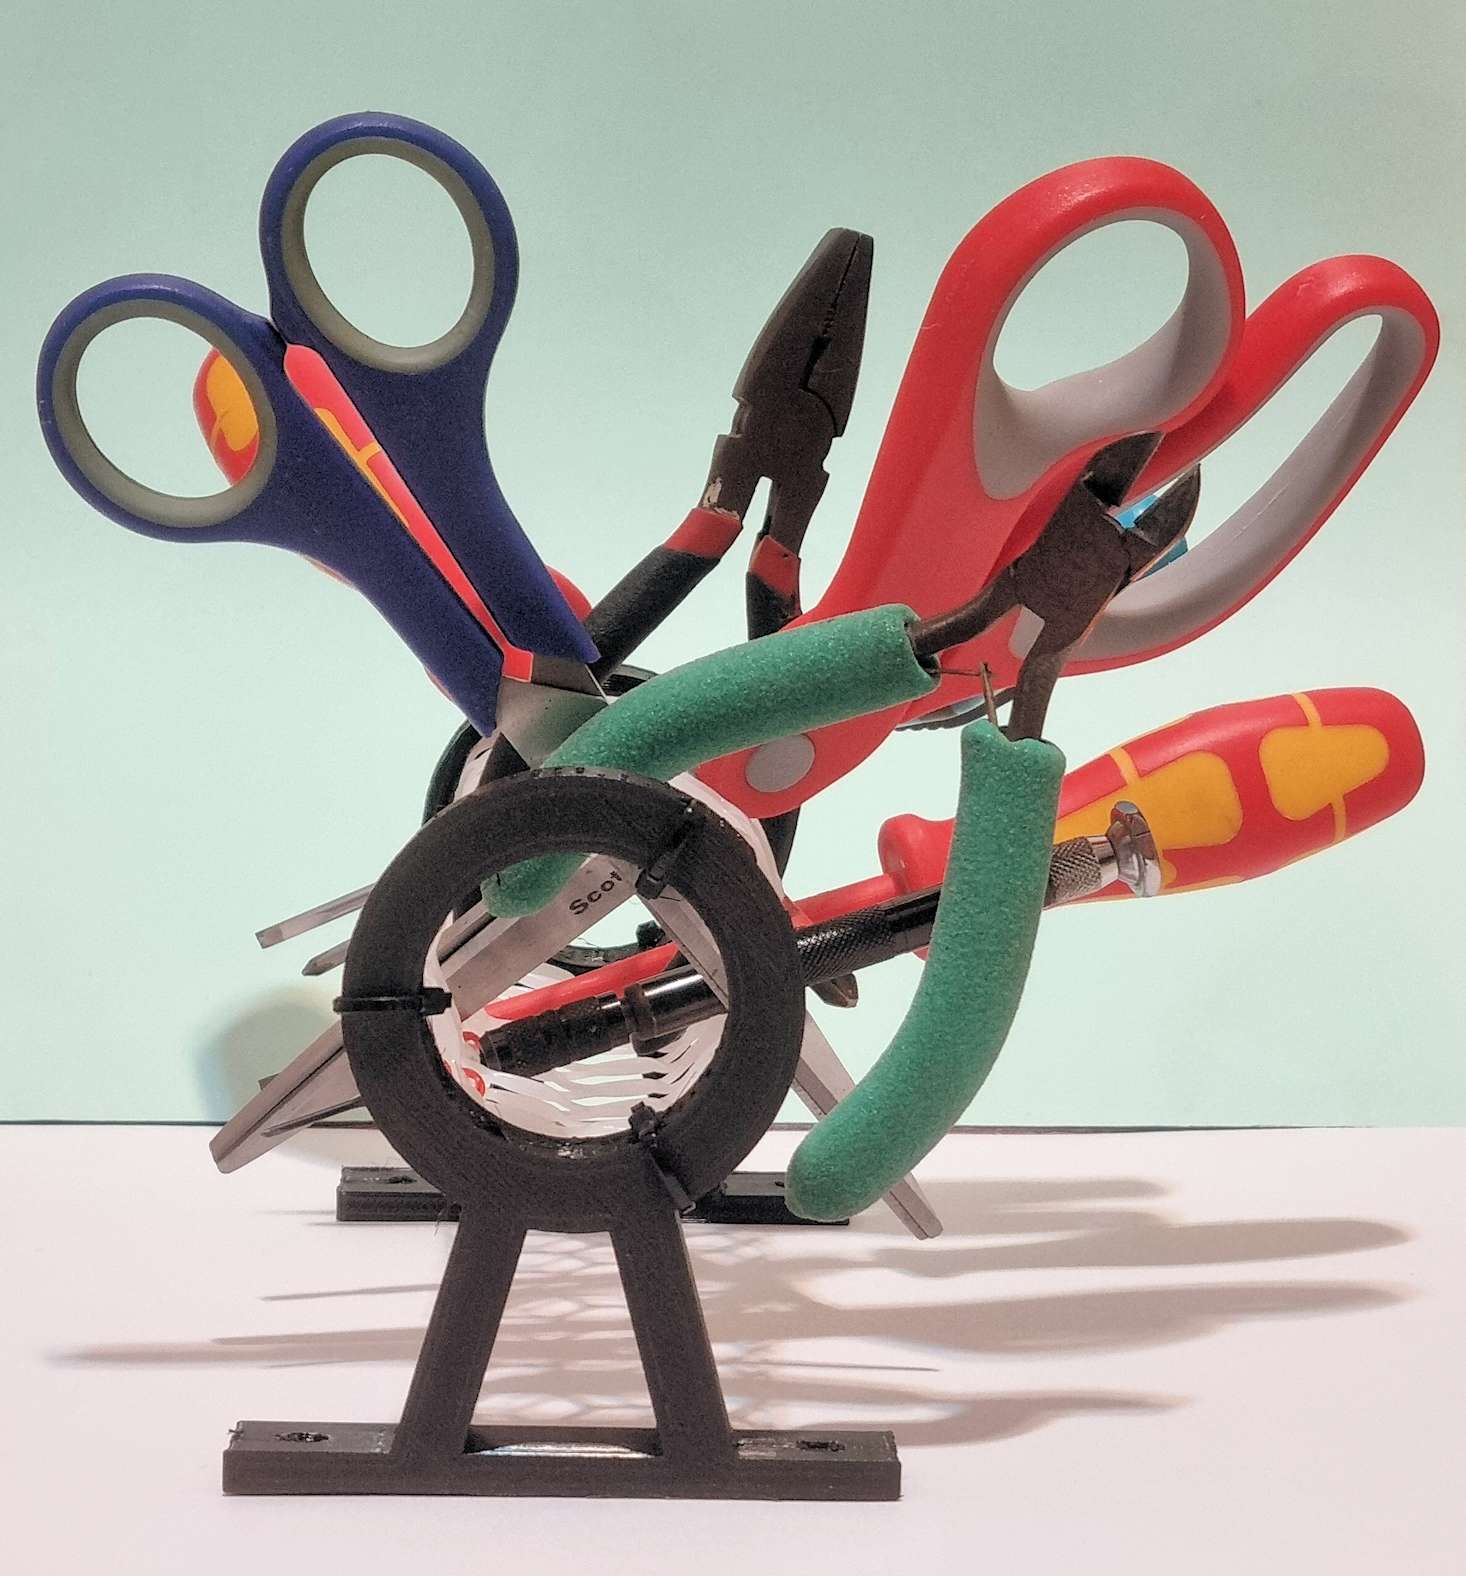
Originally, the mesh is not cylindrical. I’m not even sure such a product exists. To create it, I had to connect two opposite edges of a mesh rectangle using cable ties (“Zip ties”). Then, according to the cylinder’s diameter, I designed opposing posts into which it can be inserted. Again, zip ties are what’s holding it there. This makeshift aspect of the organizer can certainly be improved in the future. Here’s a screenshot of the post design. Yes, it’s in Tinkercad. You got a problem with that? 🙂
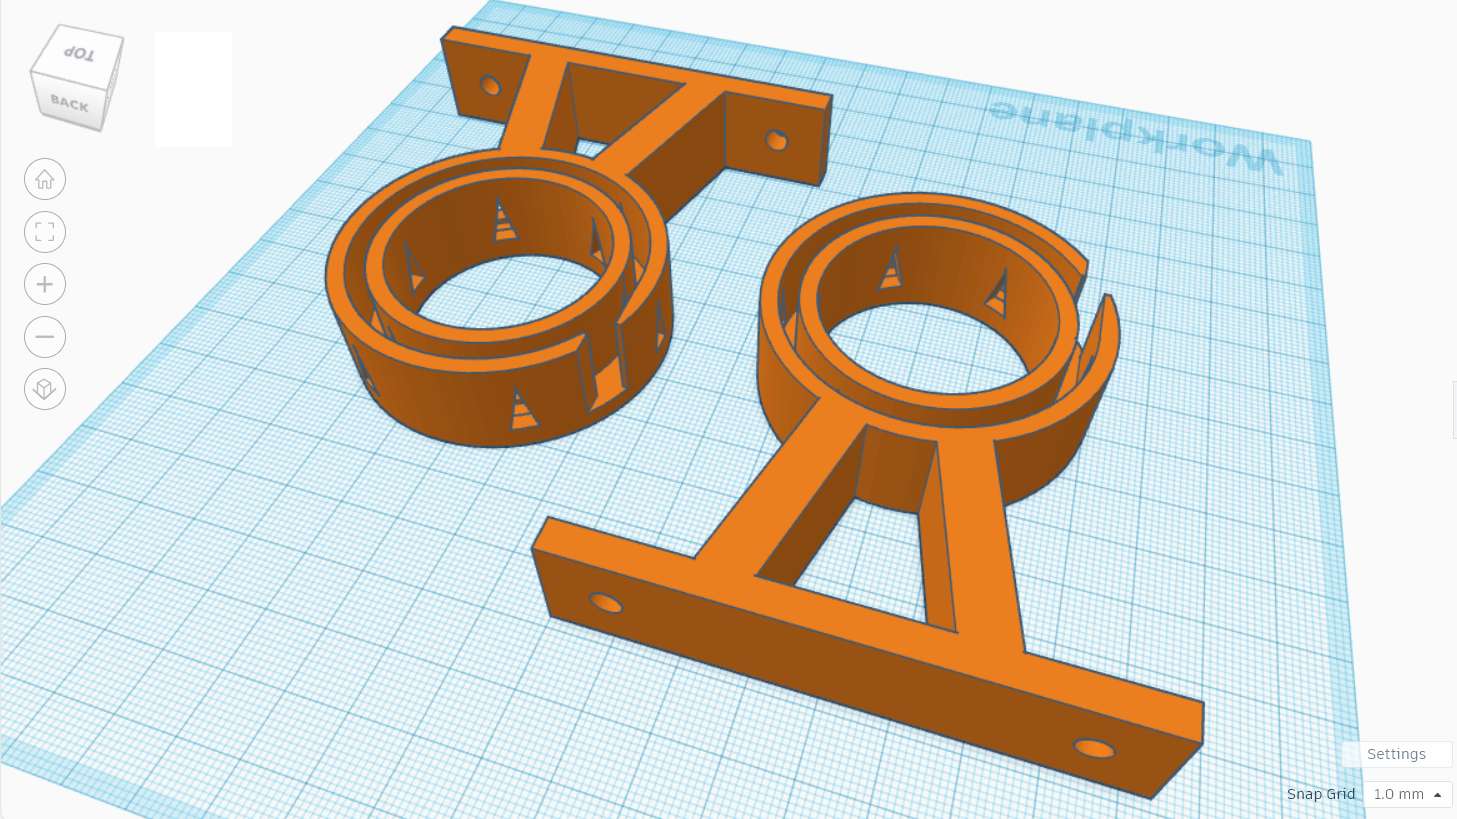
The opening on the outer rim is for inserting the mesh rectangle before tying it up. The triangular holes are for the cable ties that hold the cylinder in place; they are spaced evenly to match the size of the mesh’s hexagons.
Depending on the rigidity of the mesh, this solution can be scaled up or down. While my models are rough at the edges, they do the job for me as as hobbyist/tinkerer, and I hope the idea will benefit others too. Should anyone want to make this design into a commercial product and pay me some royalties while at it, don’t hesitate to drop me an email 😉